
Matrix is an open source protocol for secure, decentralized communication. It features VoIP, instant messaging, video calls and much more. It provides end-to-end encryption along with the ability to "bridge" other messaging services like Telegram, IRC, Slack, XMPP and WhatsApp into Matrix.
What is a Matrix homeserver?
As Matrix itself is only a specification something has to implement this specification and act as a Server. This is where Synapse comes into play. It is a reference implementation from the creators of the Matrix.
A Synapse instance is called homeserver (HS) which can be accessed through a variety of available clients, such as Element.
With the decentralized approach of Synapse you have full control of all data that is being stored. This includes user management, SSO, different identity providers, registration, data retention, etc., while still having the ability to communicate with users managed by different homeservers.
In this guide I will show you how to setup a Synapse server with working federation (the ability to communicate with other homeservers) and delegation (hosting Synapse at matrix.example.com while exposing example.com as server name) running on Kubernetes (K8S).
Requirements
This guide assumes you already have the following setup:
- A working Kubernetes cluster. A guide on how to setup a single node cluster for home usage can be found here.
- A domain as well as a subdomain to serve Synapse through (
example.com&matrix.example.com) - Valid certificates for
example.com&matrix.example.comand an Ingress thats redirects HTTP traffic to your PODs. I'd recommend Ingress Nginx. The guide linked above will cover the installation of both Ingress Nginx and a certificate manager. - Basic Knowledge about Kubernetes and Linux itself
Setting up PostgreSQL
Synapse does support PostgreSQL and SQLite as database. It is highly recommended to use PostgreSQL, as it is vastly better performing compared to SQLite.
First create a folder postgres with mkdir ./postgres next create a ConfigMap for PostgreSQL
apiVersion: v1
kind: ConfigMap
metadata:
  name: postgres-configuration
  labels:
    app: postgres
data:
  POSTGRES_DB: synapse
  POSTGRES_USER: synapse-db
  POSTGRES_PASSWORD: {CHANGEME}
POSTGRES_INITDB_ARGS: "--locale=C --encoding=UTF-8"Don't forget to set a secure password for the user.
Next a PersistentVolume as well as a PersistentVolumeClaim. I'll be using a hostPath as mount option, but Kubernetes supports many more, see here. The Capacity can be adjusted to your liking.
apiVersion: v1
kind: PersistentVolume
metadata:
   name: postgres-pv
   labels:
     pvc_type: postgres-pv
spec:
  capacity:
    storage: 30Gi
  accessModes:
   - ReadWriteOnce
  persistentVolumeReclaimPolicy: Retain
  hostPath:
   path: /PATH/TO/WHERE/DATA/SHOULD/BE/STORED
---
apiVersion: v1
kind: PersistentVolumeClaim
metadata:
  name: postgres-pv-claim
spec:
  accessModes:
    - ReadWriteOnce
  volumeMode: Filesystem
  resources:
    requests:
      storage: 30Gi
  selector:
    matchLabels:
pvc_type: postgres-pvNow we will configure a StatefulSet that will deploy one PostgreSQL POD.
apiVersion: apps/v1
kind: StatefulSet
metadata:
  name: postgres-statefulset
  labels:
    app: postgres
spec:
  serviceName: "postgres"
  replicas: 1
  selector:
    matchLabels:
      app: postgres
  template:
    metadata:
      labels:
        app: postgres
    spec:
      containers:
      - name: postgres
        image: postgres:12
        envFrom:
        - configMapRef:
            name: postgres-configuration
        ports:
        - containerPort: 5432
          name: postgresdb
        volumeMounts:
        - name: data
          mountPath: /var/lib/postgresql/data
      volumes:
      - name: data
        persistentVolumeClaim:
claimName: postgres-pv-claimLastly we need a Service so Synapse can connect to PostgreSQL
apiVersion: v1
kind: Service
metadata:
  name: postgres-service
  labels:
    app: postgres
spec:
  clusterIP: None
  ports:
  - port: 5432
    name: postgres
  type: ClusterIP
  selector:
app: postgresNow the Configuration can be applied to the cluster. This is done with
#Deploys the ConfigMap
kubectl apply -f configMap.yaml
#Deploys the PersistentVolume
kubectl apply -f pv.yaml
#Deploys the StatefulSet
kubectl apply -f statefulSet.yaml
#Deploys the Service
kubectl apply -f service.yaml
You can check the status of the StatefulSet with kubectl get statefulset and you should see
NAME                   READY   AGE
postgres-statefulset   1/1     5d11h
Setting up Synapse
First create another folder and cd to it with mkdir ./synapse && cd synapse, next create another PersistentVolume and PersistentVolumeClaim for Synapse to store configuration and media data.
apiVersion: v1
kind: PersistentVolume
metadata:
   name: synapse-pv
   labels:
     pvc_type: synapse-pv
spec:
  capacity:
    storage: 50Gi
  accessModes:
   - ReadWriteOnce
  persistentVolumeReclaimPolicy: Retain
  hostPath:
   path: /PATH/TO/WHERE/DATA/SHOULD/BE/STORED
---
apiVersion: v1
kind: PersistentVolumeClaim
metadata:
  name: synapse-pv-claim
spec:
  accessModes:
    - ReadWriteOnce
  volumeMode: Filesystem
  resources:
    requests:
      storage: 50Gi
  selector:
    matchLabels:
pvc_type: synapse-pvSynapse will be running as a normal Deployment, which is done with
apiVersion: apps/v1
kind: Deployment
metadata:
  name: synapse
spec:
  selector:
    matchLabels:
      app: synapse
  strategy:
    type: Recreate
  template:
    metadata:
      labels:
        app: synapse
    spec:
      containers:
      - image: matrixdotorg/synapse:v1.25.0
        name: synapse
        args: ["generate"]
        env:
        - name: SYNAPSE_SERVER_NAME
          value: "example.com"
        - name: SYNAPSE_REPORT_STATS
          value: "yes"
        volumeMounts:
        - name: data
          mountPath: /data
        ports:
          - containerPort: 8008
      volumes:
      - name: data
        persistentVolumeClaim:
claimName: synapse-pv-claimNote: SYNAPSE_SERVER_NAME defines the server Part of a user (e.g.: @admin:example.com) it is not the domain where synapse will be hosted from. This redirection will later be done with delegation. SYNAPSE_REPORT_STATS is enabled here, the Matrix devs need those statistics to get funding for this awesome project. If you want, this can be disabled with setting it to "no". More info on what is being reported can be found here. Also args: ["generate"] is needed so Synapse generates a homeserver.yaml configuration.
Now the configuration can be applied to the Cluster with
kubectl apply -f pv.yaml
kubectl apply -f deployment.yaml
After Synapse started the first time, go to your defined Volume. In there you should find a homeserver.yaml. If so the deployment can be temporarily deleted with kubectl delete deployment.apps synapse.
Next, we need to configure Synapse itself. Open the homeserver.yaml with your preferred editor. There is a lot of Knobs you can turn if you want. I will only cover the ones needed for the Setup.
- Verify that
server_nameis set correctly. In this caseexample.com. - Set
public_baseurlto the domain that will host Synapse. In this casehttps://matrix.example.com - Next delete the section
database:and remove the beginning#for the example Postgres section. Here we now fill in the Database connection details. The section should look like
database:
  name: psycopg2
  args:
    user: synapse-db
    password: {CHANGEME}
    database: synapse
    host: postgres-service
    cp_min: 5
cp_max: 10- If you want your users to be able to register on your server, remove the beginning
#forenable_registration: true(Note: this will allow everyone to register an account on your server) - Confirm that
report_statsis set to your liking. - If you want to allow non-admin users to create local named rooms uncomment (remove beginning
#) forenable_group_creation: true
That's it. The default for everything else should be good for now.
Now before starting Synapse again the Deployment has to be adjusted. To do so edit the deployment.yaml and delete the following
        args: ["generate"]
        env:
        - name: SYNAPSE_SERVER_NAME
          value: "example.com"
        - name: SYNAPSE_REPORT_STATS
value: "yes"The deployment can now be configured on the cluster again with kubectl apply -f deployment.yaml.
You can verify that Synapse is running with kubectl get deployment.apps
NAME               READY   UP-TO-DATE   AVAILABLE   AGE
synapse 1/1 1 1 35dWe are almost done! The last step is to make Synapse accessible from the outside.
Setting up the Ingress
Inside the Synapse folder (where pv.yaml and deployment.yaml are stored). Create the following
apiVersion: v1
kind: Service
metadata:
  labels:
    app: synapse
  name: synapse-service
spec:
  clusterIP: None
  ports:
  - name: http
    port: 8008
    protocol: TCP
    targetPort: 8008
  selector:
    app: synapse
type: ClusterIPAnd lastly the actual Ingress
apiVersion: extensions/v1beta1
kind: Ingress
metadata:
  name: synapse-nginx
  annotations:
    #This defines the maximum uploadable filesize for Media.
    #"max_upload_size" also needs to be adjusted inside homeserver.yaml
    nginx.ingress.kubernetes.io/proxy-body-size: 100M
spec:
  rules:
  - host: matrix.example.com
    http:
      paths:
      - path: /
        backend:
          serviceName: synapse-service
          servicePort: 8008
  tls:
  - hosts:
    - matrix.example.com
secretName: example.comIf you do not have a Certificate setup refer to the Guide linked under Requirements above.
The Service and Ingress are applied to the Cluster with
kubectl apply -f service.yaml
kubectl apply -f ingress.yaml
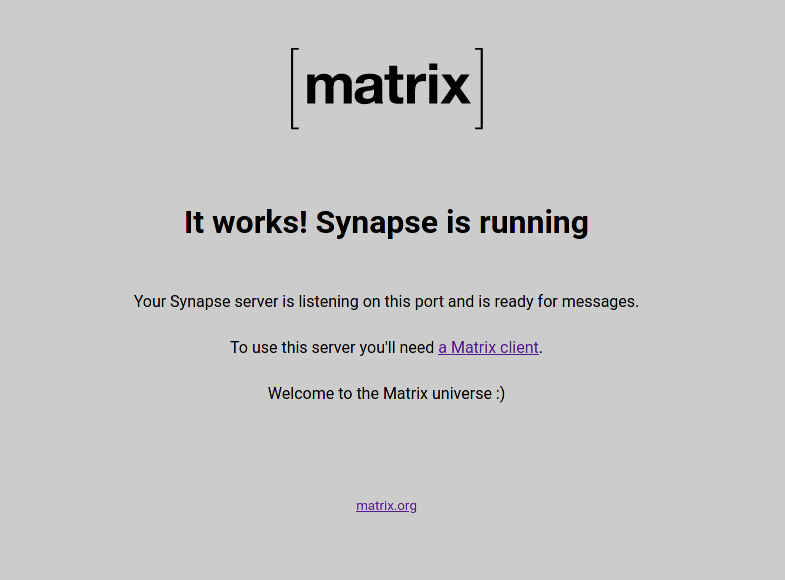
Now navigate to https://matrix.example.com, if you receive something like this: Congratulations! You have functional Synapse server.
The only thing that is left now is the setup of delegation, to get federation to work. The issue right now is, that Synapse advertises example.com but is actually being served over matrix.example.com. This means other servers (and clients) are currently not able to find your Synapse server. We'll fix that in the next section.
Setting up delegation
The reason why delegation is being used is
- The Usernames look cleaner this way (
@admin:example.comvs@admin:matrix.example.com) - You can still use
example.comfor other stuff. For example,mozilla.orgdelegates tomozilla.modular.im
There are two ways to achieve delegation: Setting DNS SRV Records or using /.well-known/matrix/. Using .well-known is the recommended way, which this guide covers.
When using .well-known another Homeserver will make an HTTPS request to https://{synapse_server_name}/.well-known/matrix/server. Which will return the actual domain and port of your homeserver. The same goes for clients except they request https://{synapse_server_name}/.well-known/matrix/client.
To configure this, create another folder mkdir ./delegation and create the configuration for nginx
server {
	listen       80;
	location / {
		return 200;
	}
	location /.well-known/matrix/server {
		default_type application/json;
		return 200 '{"m.server": "matrix.example.com:443"}';
	}
        location /.well-known/matrix/client {
		default_type application/json;
		return 200 '{"m.homeserver": { "base_url": "https://matrix.example.com" }}';
        }
}Note: Adjust the domain matrix.example.com to the domain Synapse is served through. Also be aware of the difference between Syntax on /server and /client. The Port :443 for /server needs to be there, as the default is :8443, but we serve everything from Synapse through :443.
Now create a ConfigMap with kubectl create configmap delegation-conf --from-file=./default.conf.
Now the nginx, that will serve both static endpoints.
apiVersion: apps/v1
kind: Deployment
metadata:
  name: delegation-nginx
spec:
  selector:
    matchLabels:
      app: delegation-nginx
  strategy:
    type: Recreate
  template:
    metadata:
      labels:
        app: delegation-nginx
    spec:
      containers:
      - image: nginx
        name: nginx
        volumeMounts:
        - name: conf
          mountPath: /etc/nginx/conf.d/default.conf
          subPath: default.conf
      volumes:
      - name: conf
        configMap:
          name: delegation-conf
          items:
          - key: default.conf
path: default.confApply it with kubectl apply -f deployment.yaml. Next create a Service file
apiVersion: v1
kind: Service
metadata:
  labels:
    app: delegation-nginx
  name: delegation-service
spec:
  clusterIP: None
  ports:
  - name: http
    port: 80
    protocol: TCP
    targetPort: 80
  selector:
    app: delegation-nginx
type: ClusterIPLastly create another Ingress with following content
apiVersion: extensions/v1beta1
kind: Ingress
metadata:
  name: synapse-delegation-nginx
  annotations:
    nginx.ingress.kubernetes.io/enable-cors: "true"
    nginx.ingress.kubernetes.io/cors-allow-origin: "*"
    nginx.ingress.kubernetes.io/cors-allow-methods: "GET, HEAD, OPTIONS"
    nginx.ingress.kubernetes.io/cors-allow-headers: "Origin, X-Requested-With, Content-Type, Accept, Authorization"
spec:
  rules:
  - host: example.com
    http:
      paths:
      - path: /.well-known/matrix/
        backend:
          serviceName: delegation-service
          servicePort: 80
  tls:
  - hosts:
    - example.com
secretName: example.comAnd apply it with kubectl apply -f ingress.yaml. Through Annotations, CORS Headers are set. These are needed for /client. If federation is correctly setup, can be tested with the Federation Tester. Just enter your SYNAPSE_SERVER_NAME domain if everything is correctly setup you'll see a green Success.
The last step
Now that everything is done, there is one last thing to do: Create the first user as server admin. First get the currently running Synapse POD with kubectl get pod and copy the name of the Synapse POD. Next exec into that pod with kubectl exec -it {POD_NAME} -- /bin/bash. When inside the POD, do register_new_matrix_user. Select Yes when asked to make that user admin. Exit the POD with CTRL+D or logout.
Now you are ready for the first login. There are a lot of clients that can be used, but this example will use the Element Web version that is hosted by Vector.im (You can also host your own, if you want). Go to https://app.element.io/#/login
Change the homeserver address to your subdomain, where Synapse is served through.
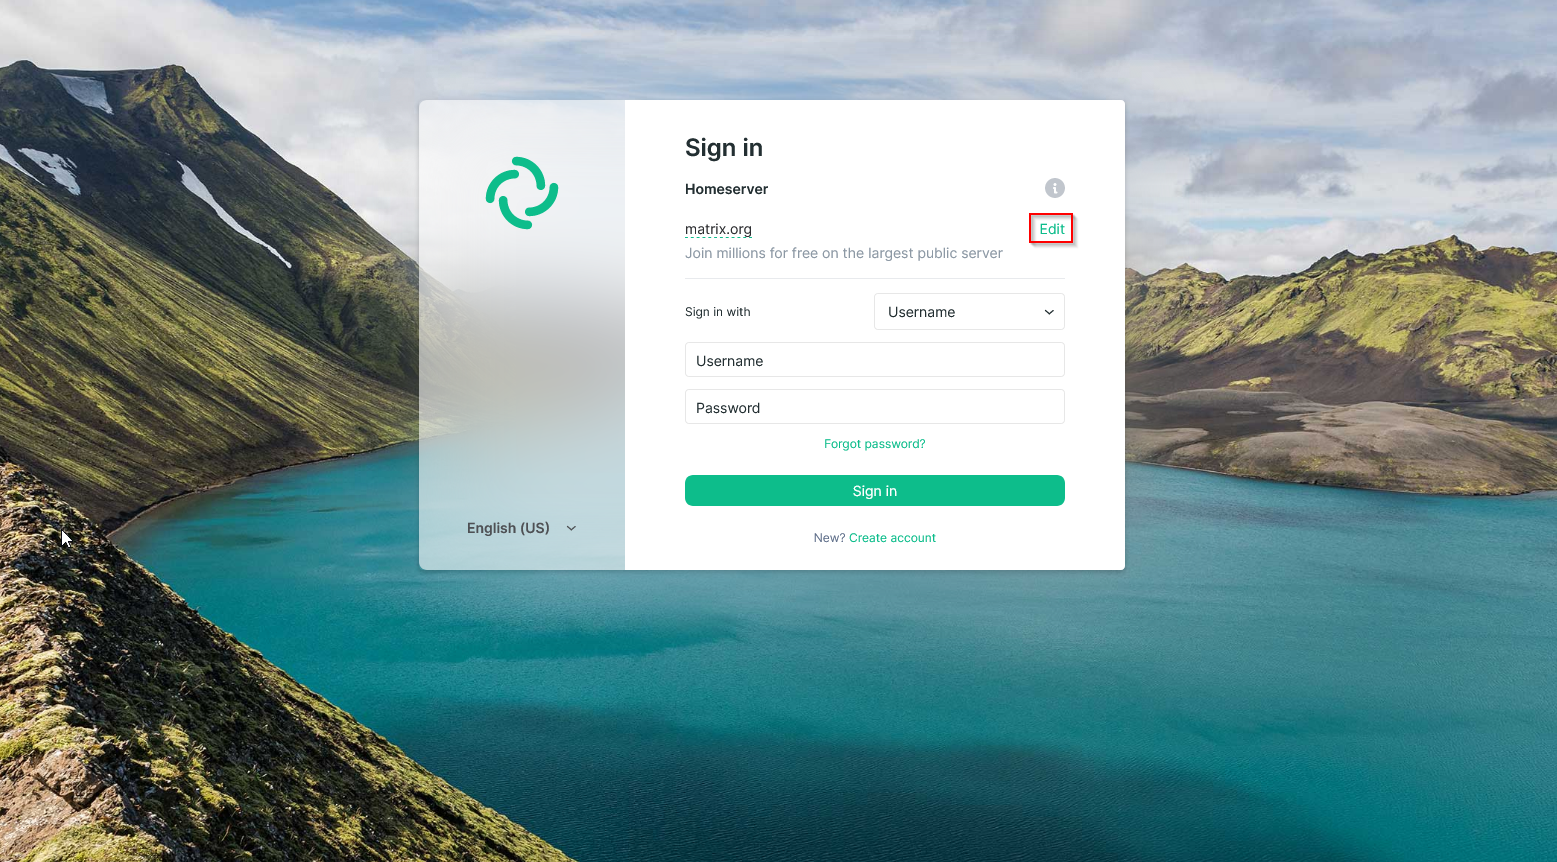
Next, login with your freshly created User.
Congratulations! You are fully setup now. As a new Synapse Admin I'd recommend you to join #synapse:matrix.org. It's a help and communication room around running a Synapse server (It's also a final test if federation is actually working).